Sunday, November 30, 2014

Santa's Sleigh - Flying Unicorn December KOM

The December Your Passion, Your Art main kit from Flying Unicorn comes with an adorable wooden sleigh for you to alter to your tastes. For me, I wanted to go for something rusty, grungy and glorious!

Here is the finished project:


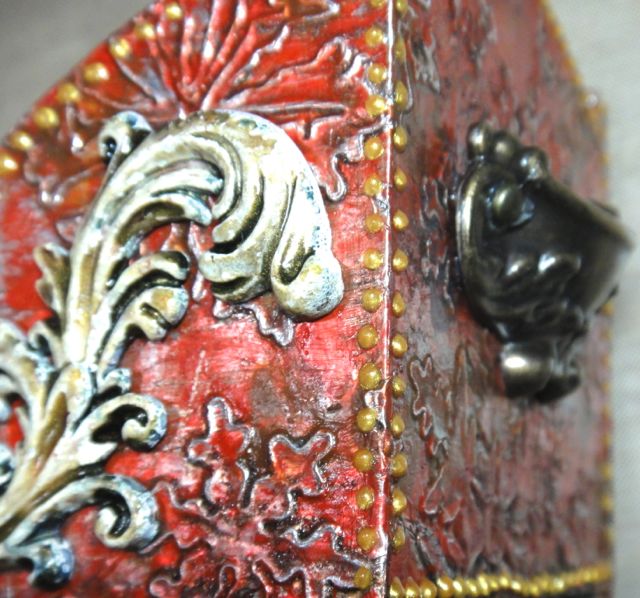
Lots going on here - I just kept building up layers until I was in love with it. I started by running foil tape through a snowflake embossing folder, then adhered that to the sleigh. You don't have to worry about your embossed images not lining up on the seams - you truly will not be able to notice at the end. I then painted over the foil tape with Gloss Gel mixed with Pearl Ex, and once that was dry, misted liberally with a dark grey mist to accentuate the contours of the embossed snowflakes. I again let it air dry (to prevent bubbling) before going back in and adding Izink in red and brown.


While the body of the sled was drying, I worked on the skids, painting them with Inka Gold, adding some grungy stamping with black ink and some metallic stickers and Ingvild Bolme Junkyard Findings.

I added faux tacks to the sides of the sleigh with a pearl pen, and finished it off with resin swirls from the kits sprayed with black and gold mists and some G45 drawer pulls flipped upside down dabbed with gesso.


Be sure to grab your kit quick - there are only a few left! And remember to check out our preorders every month, where you can preorder your kit and add-ons and be guaranteed to get one (often delivered on or before the release day within the US).

Supplies Used:

From the Kit of the Month and Add-Ons:

- Wooden sleigh
- Prima Shabby Chic Swirls (I picked up an extra pack to have matching swirls on both sides)

From My Stash:

- Foil tape from the hardware store
- Tim Holtz Texture Fade: Snow Flurries and Snowman
- 13 Arts Gel Medium
- Peal Ex: Mink (from a previous Flying Unicorn kit)
- Mister Huey mist: Clay (from a previous Flying Unicorn kit)
- Izink: Tomato, Ambre
- Viva Inka Gold: Graphite
- Tim Holtz Industrious Stickers: Metallic (from a previous Flying Unicorn kit)
- Prima Ingvild Bolme Junkyard Findings
- Kaisercraft Stamp: Edges (from a previous Flying Unicorn kit)
- Prima Chalk Edger: Black Coal (from a previous Flying Unicorn kit)
- Graphic 45 Staples: Antique Metal Door Pulls
- Viva Pearl Pen: Gold (from a previous Flying Unicorn kit)
- 13 Arts Gesso

Saturday, November 29, 2014

Flying Unicorn December Kit Reveal

http://www.flyingunicornstore.com/category_s/1422.htm

Baby its cold outside, but the creative fire makes it a warm and cozy inside! We are so thrilled to showcase our December Kit of the month with the newest collection by 13@arts Cozy Evening! Our kits are overfilled with with yummy goodies that will let you explore your passion and create those perfect memories. So without further adieu Flying Unicorn proudly presents Your Passion, Your Art - December 2014 Kit of the Month


http://www.flyingunicornstore.com/category_s/1433.htm


Our main kit is never complete without an off the page project to get you creatively thinking outside the page! This month bling Santa's ride! Custom his sleigh and make his ride the talk of North Pole!


http://www.flyingunicornstore.com/category_s/1422.htm


From the beginner to the avid mixed media artist our Mixed Art add on kit will surely please you. Our Mixed Art kit will always come with a canvas and mixed media art supplies to advance your skills as an artist.


http://www.flyingunicornstore.com/category_s/1433.htm
Flowers, vines,and embellishments oh my! Our Mixed Passion is a collection of everything pretty to add to the Main kit or the add on kits. The colors and embellishments will enhance your Kit of the Month creations or it can stand alone and you can create something magical! So turn the music, make some hot cocoa and lock your self away while you create some art


http://www.flyingunicornstore.com/category_s/1433.htm
Our Small Art Big Passion is all about the love of making cards, tags atc's and anything in between.From Stamps, flowers, paper and embellishments in between the yummy goodies included will enhance any of the kits or stand alone .


We are thrilled to present great tutorials, techniques, videos and Build a Page using our Kit of the Month to help you grow in the passion of your art. So stay tuned there is so much more to come in the next week!

Kits and Add On Kits are limited so do not delay in getting yours!

Friday, November 28, 2014

Prima 12 Days of Christmas Cards - Bloom Girls

Hi there! Today I have another Christmas card to share - I think that brings me up to 4 for the year, I'm on a roll! For this one I'm playing along with Prima's 12 Days of Christmas Cards once again. Day 8's challenge is to create a Christmas card using Jamie Dougherty's beautiful Bloom Girl stamps.

I chose Free Spirit for my stamp and stamped her onto specialty paper with permanent ink before colouring her in using Copic markers. To add interest, I cut the image out in an oval, leaving the hair and feathers at the bottom overhanging the frame.


I wanted to stick with blues for my background, and combined papers from 3 different paper lines. Don't they work nicely together?

I've been hoarding these crocheted flowers to use as snowflakes on a project, and that project finally arrived! Some Prima Say It In Crystals centers finish them off beautifully.


Prima Supplies Used:

- Bloom Girl stamp: Free Spirit
- Flowers: Round Crochet Doily (569464)
- Say It In Pearls: Center Gray (530815)
- Journaling Card
- Jodie Lee Art Journal paper
- Seashore paper: Sea Shell
- Delight paper: Discover
- Canvas Alphas: Fairy Belle (555375)


Thursday, November 27, 2014

Prima 12 Days of Christmas Cards - Trims

Good morning, Bloggers, and Happy Thanksgiving to my American friends! I'm sneaking in for a quick before work post to share a Christmas card I made for Prima's 12 Days of Christmas Cards challenge - Day 6 Prima Trims.


I started out with layers of Prima Cigar Box Secrets papers - they might not scream Christmas when you look at each individual sheet, but the reds and golds add a festive touch. To create my wreath, I started with one of the Blue Fern Studios Graduated Circles chippies, and wound Prima Wire Thread in Dusty around (and around and around!) it. To give it a Christmasy feel, I then misted the whole thing with Color Bloom sprays in Tea Stain and Antique Gold for some glorious shimmer.


I used a Prima Providence Vine in Basil to accent the wreath, leaving the stems and sprigs their natural white, but colouring the leaves gold using Gold Foil Color Bloom on a paintbrush. One of the Prima Sunset - Dark vellum flowers made a stunning but understated centrepiece for the wreath.


I finished the card off with a resist canvas banner coloured with chalk edgers, some alpha stickers and a couple curlicues of wire thread.


Thank you for stopping in today!


Prima Products

- Prima Wire Thread: Dusty (572044)
- Prima Color Bloom sprays: Gold Foil, Antique Gold, Tea Stain
- Prima Providence Vine: Basil (578282)
- Prima Sunset Vellum Flowers: Dark (577865)
- Prima Cigar Box Secrets papers: Robusto, Presidente, Figurados
- Prima Chalk Edgers: Dark Rust, Brick Wall
- Prima Resist Canvas stickers
- Prima Craftsman Alpha Stickers

Blue Fern Studios Products

- Graduated Circles chipboard


Monday, November 24, 2014

Happiness Is This - Prima November BAP

I found myself with a little extra scrappy fun time at the beginning of this month, so I made some time to play along with one of my favourite challenges - the Prima BAP.


I did a lot of work on the background of this one, starting with laying down a layer of clear gesso, then adding layers of paper strips and fussy cut images, which I blended in using white gesso. I then added stamping with Prima Stitches stamps, and heat embossed the lines in a bright red to contrast with the layers of blue Color Bloom sprays I added to the background.

Here is the sketch, by the talented Keren Tamir.


A couple closeups:

To get the depth as well as shimmer on the Wood Icon bugs, I gave them a rough coat of Super Heavy Gesso in Black before adding Color Bloom sprays.


A layout just isn't complete without some chipboard - I added a little Blue Fern Studios chipboard covered in copper embossing powder behind my photo.


Adding a pop of a contrasting colour is a great way to add visual interest, as you can see by the bright red stitching.


A little black outline to the canvas alphas just makes them pop.


Thank you so much for stopping by today!

Prima Supplies Used:

- Prima Cigar Box Secrets: Perfecto, Panatela, Figurados, Corona
- Prima Canvas Alphas
- Prima Craftsman: Bosque Vines
- Prima Washi
- Prima Stitches Stamps: Lines, Circles
- Prima Color Bloom: Soft Teal, Summer Sky, Cobalt
- Prima Mask: Poppies and Peonies 6x6
- Prima Heavy Gesso: White
- Prima Chalk Edger: Black Coal
- Prima Stationer's Desk: Wooden Icons
- Prima 3D Gloss Gel
- Prima Cigar Box Secrets: Say It In Crystals


 - Blue Fern Studios Chipboard: Turkish Bits

Saturday, November 15, 2014

A Trio Of Tiny Tags

Hi there! How's the weekend treating you? The weather here is hovering just around freezing, with clear blue skies, so it looks like this is the weekend to put up our Christmas lights and clean off the roof before the rain comes back. It's crazy that it's time for Christmas preparations to start already.

The November Flying Unicorn Small Art, Big Passion Add-On contained 6 mini tags - 3 in white and 3 in pink, perfect for those little packages. I'm stopping in today to share my projects with the 3 mini white tags.

I started by misting all three tags with the three Lindy's mists from the Main Kit and Mixed Art Add On, then went in three different directions from there.

For the first tag, I added a little shading around the edges with Distress Ink, then used the Viva Pearl Pen from the Mixed Passion kit to draw circles in various sizes on the background. Once those were dry I coloured the insides using Viva Inka Gold.

The dragonfly Stamp and Add set was included in the Small Art, Big Passion Add On, I stamped the image on a scrap of paper, and added some shading around the edges with Distress Ink.


Here's a closeup of the background:


For the second tag I sprayed the mists more liberally on the background, and once they were dry added some Shimmerz Dazzlerz from my stash and pressed the gold microbeads from the Mixed Art add on into the wet medium. While that dried I coloured one of the Julie Nutting Mini Wooden Dolls from the Small Art add on, using 13 Arts paints. I achieved her skin tone by mixing Sand and Cocoa with a little bit of White. For the red accents I used Twinkling H2Os.


For the third tag, I added some light stamping to the background with a grey chalk edger, which I also used around the edges. A couple touches of Pearl Pen and a Stamp N Add Butterfly and the tag is done!


A little Distress Inking around the edges of the butterfly to add some depth.


Thank you for stopping by today - I hope you have an amazing weekend!

Supplies

November Kit of the Month and Add Ons
Distress Ink: Rusty Hinge
Viva Decor Inka Gold: Steel Blue
May Arts Textured Lines Ribbon: Blue/Green
Prima Chalk Edger: Old Road, Black Coal
Jute twine
Shimmerz Dazzlerz: Gummy Beary Blue
Twinkling H2Os: Love Struck
13 Arts Paints: Matte Cocoa, Matte Sand, Matte White
Prima Stamp

Wednesday, November 12, 2014

Scrap Around The World Guest Spot

As I write this it's Remembrance Day here in Canada, a day where we look back at the sacrifice and heroism of the two World Wars, and pay tribute to the brave men and women who have served in armed conflicts through time and across the world.

As I watch the documentaries on the History Channel and think back about family members who have served, I can't help but be thankful for the life and freedom we enjoy. So the message "Life Is Beautiful" from the November mood board at Scrap Around the World is especially resonant right now.

The Flying Unicorn CT are guest designers at SATW this month, and I found this mood board so easy to play with. 

Here is my layout:


And the beautiful mood board that inspired it:


Isn't it sublime? I took inspiration from every pane of this mood board - the music notes are echoed by the Tim Holtz tissue tape on the background, and twine is tucked into the flower cluster, I took the colours and cascading nature of the flowers as inspiration for my cluster, I replicated the "Life Is Beautiful" notecard, I used a doily stencil on the background, and I chose a photo that echoed the light and colourfulness of the last pane.

A couple closeups:


Thank you for stopping by today. Take a moment to hold your family close, and to be thankful for what we have - we will never forget.

Supplies Used:

Prima Cartographer: Boussole paper, 3x4 ATCs
Faber-Castell Pitt Pen: Black Medium
- Liquitex Gesso: White
Lindy's Stamp Gang sprays: Bucket O' Blood Red, Bougainvillea Fuchsia, Bit O' Bubbly, California Poppy Gold
- Tim Holtz Tissue Tape: Symphony
- Liquitex Light Modeling Paste
- Prima 12x12 Stencil: Doily
- Prima Flowers: Rondanthe - Esplanade (577759)
- Stamens
- Shimmerz Coloringz spray: Pink Stilettos
- Prima Color Bloom spray: Lime Wedge
- Ranger Embossing Ink Dabber
- Georgia Heald stamps
- Lindy's Stamp Gang embossing powder: Midnight Copper
- Prima Divine: Chipboard stickers
- Washi tape
- Flying Unicorn Adornments: Country Garden
- Jute Twine
- Prima stamp
- Prima Chalk Edger: Coal Black